Showing posts with label Blogging. Show all posts

Wednesday, 5 August 2015

HOW TO ADD ANIMATED FLYING TWITTER BIRD TO BLOGGER

HOW TO ADD ANIMATED FLYING TWITTER BIRD TO BLOGGER


You Might be surprised to see a twitter bird flying along with you while you browse this blog. Well this is a Popular Widget and Also it is Very easy to install.Wherever You Scroll on the Page the Twitter Bird Follows you on the Page.So Add this Simple Widget and Add Some Uniqueness to your Blog.

How to add Animated Flying Twitter Bird:.


1. Go to Blogger Dashboard > Template> Edit Html.

2. Now Search for  <head> tag and Paste the Below Code Above it.

3. Save Your Template.

<script src="http://btsnts.googlecode.com/files/btsnts-tripleflap.js" type="text/javascript">
</script>
<script type="text/javascript">
var twitterAccount = "YourTwitterUsername";
var tweetThisText = " <data:blog.pageTitle/> : <data:blog.url/> ";
tripleflapInit();
</script><span style="font-size: 11px; position: absolute;"><a href="http://www.ngupdates.com/" target="_blank" title="Blogger Widget by NGUPDATES">NgUpdates</a></span><!-- Twitter Bird Widget for Blogger by computer entertainment-->


Now Replace YourTwitterUsername with your twitter Username That's It.Now You're Done.

Enjoy!

Thursday, 16 July 2015

BEST ALTERNATIVE FOR GOOGLE ADSENSE


What a nice phrase to start the day huh? Well, consider you’re not alone. Everyday, hundreds or thousands of accounts are being rejected or banned from Google’s Adsense program. Why? I can’t tell you specifically. Either there’s something wrong with the web you’re putting you ads on, or you just simply missed one rule from Google’s TOS.

Instead of crying or bashing Google in multiple forums (actually, this is a very bad idea), remember the world is not over yet, and there are plenty of alternatives out there to try. Google was just your first one, and you failed.

So, stand up, be proactive and act professional! There’s no time to lose.

Here is one of the best Google Adsense Alternatives you can try to monetize your website without using Google Adsense, and I’ll tell you how they work and why you should consider them, so let’s start:

Revenue Hits

I recently discovered Revenue Hits and it looks like a great contender. I signed up and was quickly contacted by a manager to see how their ad platform for publishers work and they have a ton of features to make money. Revenue hits is a Performance Ad network, which means they pay you for results (CPA which is great for many niches), however, they have CPM and CPC models too. 

Revenue hits has an interesting platform that learns from your Ads so if you give them a try make sure to keep their ads running for 2-4 days to get the best results. Another great thing is that they have different monetization channels available. You can create banner ads, sliders, pop -unders, buttons and more. Revenue Hits pays on a NET 30 basis and they issue payments via wire, Paypal and Payoneer! Create your account and get started in just a few minutes>>> Best Adsense Alternative

Monday, 6 July 2015

HOW TO USE BING WEBMASTERS TOOL FOR EFFECTIVE SEO


Google is the worlds no 1 search engine which we all know and so don’t focus your site to rank just on Google. You must also focus on other major search engines. Bing is the second largest search engine and therefore analyze your sites performance in Bing using Bing webmaster tools. To get your sites SEO report like indexed pages, crawls, clicks, malwares, errors and to know the sites performance in search engines you must use webmaster tools. We have discussed about GOOGLE WEBMASTERS TOOLS and now it’s time to show you how to use Bing webmaster tools for SEO.

How to use Bing webmaster tools

Submitting your site to Bing webmaster tools

Head to BING WEBMASTERS TOOLS and login with your Microsoft account if not sign up. The first thing you need to do is add your site. Enter your website URL and add your site. At the next page add your sitemap select alert preferences and save.


Verifying your site to Bing webmaster tools

Now Bing needs to verify the ownership of your site. You need to verify your site using any one of the three option XML file verification, Meta tag verification and adding CNAME records. Option 2 META TAG VERIFICATION is easy and simple. This article can guide you with Meta tag verification for Google, Bing and Alexa. Once done click verify below.

Dashboard – Bing webmaster tools

Once verified you will be headed to Dashboard which shows your site activity (clicks from search, appeared in search, pages crawled, crawl errors and pages indexed), search keywords and links. Since your site is new to Bing webmaster tools you won’t see any data or reports at this time. Your webmaster navigation menu lies in left side.


Configure My Site – How to use Bing webmaster tools

Click Configure My Site where you can add and see sitemaps, submitted URLs, URL parameters, Crawls control and blocked URLs. You can configure your site more in detail using sub tabs.

Sitemaps

By submitting sitemaps you are helping Bing to know your site structure. It also helps all you site pages to easily index in Bing.

Submit URLs

If you want any of your pages or posts needs to be quickly indexed in Bing search results then you can use this feature. Enter URLs one per line and the maximum limit to submit your URL per day is 10 and 50 for month.

Ignore URL parameters

This helps you to avoid duplicate content within your site. If any of your site pages have two different URL you can submit the less preferred URL here which gets ignored in Bing search results. This option is not needed for those who using canonical tags in their site.

Crawl control

Here you can specify Bing the time to crawl and the crawl rate (faster or slower). Faster crawling can slow down your site so better leave it as default settings.


DeepLinks

You cannot add deep links and Deep links are links that appear next below to your site in search results. It is what called site links in GOOGLE WEBMASTERS TOOLS. The most important and relevant pages are added as deep links which is automatically generated by Bing. When users search your website they will see deep link next below to you site so they can pick the most important. Here you can block any deep links if you want.

Block URLs

If you want to remove any of your site pages or directory from Bing index you can do it here. Just select directory or page and enter the URL to be blocked and block URLs and cache.

Disavow Links

If you don’t want any links you can tell Bing to disavow links. Select page, directory or domain and enter the URL to disavow links.

Geo-targeting

If you want to target your site to Specific County then just select domain, sub-domain, page or directory and submit the URL.

Verify ownership and Users

You have already verified your site ownership. If you want to check you site verification then you can see at the bottom of the verify ownership page. If you wish to allow other user to access your Bing webmaster tools with different account then you can specify here. Enter the email, user role and site to manage.

Reports & Data – How to use Bing webmaster tools

Here you can see the complete report and data of your site that is page traffic, search keywords, SEO reports and crawl errors.

Page traffic – Here you can see your site traffic data and most popular pages in Bing. It shows the click from search, appeared in search, CTR and search keywords. You can also export this data as excel file.

Index Explorer - It shows the categories, pages and number of URLs indexed by Bing.

Search keywords – Here you can see the top keywords that your site pages are performing in Bing.

SEO reports – Here you will get SEO suggestion for your site to rank in Bing.

Inbound links – Know the number of inbound links pointing to your site and target pages.

Diagnostics & Tools – How to use Bing webmaster tools

Here you will find some useful SEO tools for webmasters. Before optimizing your site keyword research is the first step to carry out and so do your keywords research here you can find some list of keyword research tools. Link explorer helps you to explore the number of backlinks pointing to that URL. If you want to see how your site appears for Bing search engine then enter the URL to fetch as Bingbot. If your site using structured data like Microformats and Schema.org then you can validate using Markup validator. Use SEO analyzer if you want SEO suggestions for any of your individual pages.


Hope this article helped you on how to use Bing webmaster tools for SEO. Please share and leave your comments below.

HOW TO USE GOOGLE WEBMASTERS TOOL FOR EFFECTIVE SEO


Google has two programs for SEO one is the Analytics which just shows the traffic resources to your website and other is the Google Webmaster Tools which is an amazing program for every site owners that tends to analyse your site completely and helps to improve your site visibility in Google searches.

This post helps you on how to use Google Webmaster Tools effectively for SEO. It covers the following below.

* Adding & Verifying your website
* Submitting your sitemap
* Search Appearance
* Search Traffic
* Google Index
* Crawl Errors & Stats

How to use Google webmaster tools

Adding & verifying your Website:

1. Go to www.google.com/webmasters/tools/ and sign in with your gmail account

2. Now click Add a site and enter your domain url. Now it will take you to the site verification page.       In order to manage your website first you need to verify your website.

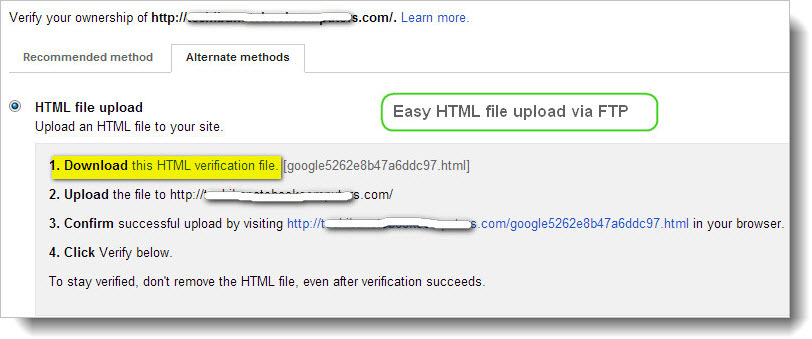
3. Choose alternate methods and select HTML file upload to verify your site which is an easy process     than recommended method.


4. Download the HTML file and upload it to /public_html.


5. Now click Verify and continue to your Webmaster Tools


OR YOU CAN SIMPLY USE META TAG VERIFICATION

RECOMMENDED: META TAG VERIFICATION FOR GOOGLE, BING AND ALEXA

Submitting your SiteMap

By submitting your sitemap you are helping Google to crawl all the pages and links in your website for easy index. There are many third party tools for creating sitemap to your site, but if you are using wordpress install Google XML sitemap plugin in your website

RECOMMENDED: EASIEST WAY TO CREATE A SITEMAP FOR BLOGGER BLOG

Search Appearance

Search appearance uses your website to illustrate the elements in Google search results. Click the ? near to search appearance, a pop up window opens which helps to visualize how your site will appear on search results.

Google automatically adds the most important and popular pages and site links which appears below your search results. Site links helps users to navigate your site easily. You can also demote any link if you don’t want it to appear.


Search Traffic

This portion is similar to Google analytics that helps you to find top queries and top pages of your site by traffic(No of impression & clicks). It also deals with number of backlinks, Internal links and who links the most to your site.

Google Index

Google Index shows the index status of your site. It graphs the number of pages and url’s indexed by Google, it analyses the content keyword of your site and its significance .

Crawl Errors & Stats

It shows the data of DNS, server connectivity and Robots.txt fetch is proper or has some errors. The crawl stats shows the no of pages crawled per day, once you have submitted your sitemap to Google these crawling spiders enter your site and crawls all the pages, and url’s….. You should BLOCK several URLs of your site (Disallow to index server files) to prevent your site from hacking..

If you are using wordpress use this following code paste it in notepad and save it as robots.txt and upload it to /public_html

1 User-agent: *
2 Disallow: /cgi-bin/
3 Disallow: /wp-admin/
4 Disallow: /wp-includes/
5 Disallow: /wp-content/plugins/
6 Disallow: /wp-content/cache/
7 Disallow: /wp-content/themes/
8 Disallow: /trackback/
9 Disallow: /feed/
10 Disallow: /comments/
11 Disallow: /category/*/*
12 Disallow: */trackback/
13 Disallow: */feed/
14 Disallow: */comments/
15 Disallow: /*?

Hope now you got a clear idea on how to use Google webmaster tools after reading this post.

PLEASE USE THE COMMENT BOX FOR ANY QUESTION

META TAG VERIFICATION FOR GOOGLE, BING AND ALEXA


Know your websites statistics and performance in web using GOOGLE WEBMASTERS TOOL, BING WEBMASTERS TOOL and ALEXA and in order to show the statistics of your site Google, Bing and Alexa needs to verify your website.

We have discussed a lot about How to use Google webmaster tools effectively for SEO. All the three have various type of verification method like html file upload, XML upload, using domain name provider and more, but what all have in common is Meta tag verification. This post helps you on Meta tag verification for Google, Bing and Alexa.

Meta tag verification for Google

Once you added your site to Google webmaster tools you will see an option “verify your site” click and check HTML tag verification method and you will see a Meta tag like this

meta name=”google-site-verification” content=”sdffdsfgsgsgdshernynyu-kyuk7ZgsdiCK1e-khkjhkhmbdbvc” />

What you need to do is copy it and paste it to your websites < head > section. If you are using wordpress you can add it from your Dashboard > Appearance > Editor and select header.php and add below the < head > tag and click verify in your Google webmaster tools.


Bing Meta tag verification

In Bing webmaster tools go to “Configure my site” and there you will see “verify your site” open and you will have two options one XML and other Meta tag verification.

You will see a Meta tag verification for Bing like this

 < meta name=”msvalidate.01″ content=”E6888vB9GDSGDSGJOJOJOIWF3r2BC613BBE7″ />  copy the tag and paste it below your Google verification code and verify your site in Bing.

Alexa Meta tag verification

In your Alexa Dashboard you can see “claim your site” option in site management. Open and you will be given a verification id like this

[kOGOPOP_KKNKNOpm3Ufdsfdsf_swehnyjmuy] You can use that code and paste it to your < head> section or you can use the code like this < /head> section or you can use the code like this < meta name=”alexaVerifyID” content=” kOGOPOP_KKNKNOpm3Ufdsfdsf_swehnyjmuy ” />

Note: To stay verified do not remove these Meta tags from your website.

Hope you found this article useful on Meta tag verification for Google, Bing and Alexa. Pls Comment and share.

EASIEST WAY TO CREATE A SITEMAP FOR BLOGGER BLOG


A Sitemap is nothing but a list of accessible pages in your website. Sitemaps helps search engines like Google, Yahoo and Bing to easily crawl pages in your site which helps in better index. As a blogger you must create a sitemap so whenever you make a new post search engines can crawl and index them easily. In this post let’s see how to create sitemap for Blogger blog and submitting it to Google webmaster tools and in robots.txt.

Default Blogger Sitemap

By default your blogger blog will have sitemap, but the issue with that sitemap is it only shows your recent blog posts (example). A perfect sitemap is that it should contain the list of all you pages so that search engines know the complete structure of your site. Let’s see how to create sitemap for Blogger blog.

How to create sitemap for Blogger

Creating sitemap is very simple and this sitemap works for both self-hosted Blogger blogs and normal Blogger blogs. Just use this (atom.xml?redirect=false&start-index=1&max-results=500)next to your blogs URL. See example below.


http://yourblogname.blogspot.com/atom.xml?redirect=false&start-index=1&max-results=500

Now you have created sitemap for your Blogger blog, but you need to tell search engines about your sitemap so that bots can know your site structure. There are two ways to tell search engines about your sitemap.

1. Showing your sitemap in robots.txt file and 2. Submitting your sitemaps in Google webmaster tools

Adding your Blogger sitemap in robots.txt file

Login to your Blogger blog and go to dashboard >> settings >> search preferences and edit the custom robots.txt. Enable and paste the following text and click save changes. Make sure to change your blog name in Blogger sitemap below.


So whenever search engines crawls your site they will access your Blogger sitemap from robots.txt file.

Submitting your Blogger sitemap in Google webmaster tools

Login to your GOOGLE WEBMASTER TOOL and select you website. In your site dashboard click sitemaps below. Now click add/test sitemaps, add your sitemap (just the atom.xml?redirect=false&start-index=1&max-results=500) and submit your sitemap.

That’s it you have successfully submitted your sitemap in Google webmaster tools. Now it’s ready for crawling and indexing. You can find the number of pages crawled and indexed in Google webmaster tools.


If you like then also submit your Bloggers sitemap to BING WEBMASTERS TOOL

Hope this helped you on how to create sitemap for Blogger and submitting it in robots.txt and Google webmaster tools. Please leave your comments below.

Tuesday, 30 June 2015

SIGN UP FOR KONGA AFFILIATE PROGRAM AND EARN 500NAIRA IMMEDIATELY ( MORE EARNINGS IN THE LATER FUTURE)


What do I need to become an affiliate?
Nothing! Except your desire to be an affiliate.
You don't even need a website (although having your own website helps). You can promote Konga product via search engines and social media networks, postings in forums, or simply email to all your friends and people you know with your affiliate link attached to our product. If you have your own website, simply talk to your visitors in real time using live chat software on your website and send them your affiliate links through chat. All you need to do is to send a visitor to Konga.com via a special link (called 'affiliate link'), and if he or she buys anything from them, you will get commission

How do I know I will be paid for my referral?
The program is powered by Konga Affiliate Pro, the leading affiliate tracking software. Konga Affiliate Pro uses combination of cookies and IP address to track referrals for best possible reliability. When the visitor follows your affiliate link to their site, their affiliate system registers this referral and places cookie on his or her computer. When the visitor pays for the product, affiliate system checks for cookie (if not found, checks for IP address of referral) and credits your account with up to 9% of the purchase value. This process is absolutely automatic. All your referrals will be properly tracked. Konga Affiliate Pro is used by thousands of Internet merchants and affiliates world-wide.

What am I saying so Far?
It doesn't matter if you even own a Blog/website Or Not, as long as you own a Social Media Account, you can make some cool bucks with Konga Affiliate program, you can make Sales through Word of mouth, or your Social Media Accounts (telling people to Shop on Konga through your Affiliate Link). Like I said before, they make it very Easy, with Full Support and Quick Response system for their Affiliates.

Earning 500 NAIRA for signing up
The sweetest part of Konga affiliate program is that you gonna get 500 naira for signing up. I know its kinda small but at least it shows they are for real.

How do i sign up?
Signing up is very easy and it is completely free. All you have to do is to fill the form below and click on sign up or CLICK HERE>>>

Please make sure to fill in a valid account number as all earnings shall be paid there.


Personal Information

Additional Information


>>>PLEASE FEEL FREE TO SHARE<<<

Monday, 29 June 2015

HOW TO REMOVE "powered by blogger" ATTRIBUTE FROM YOUR BLOG


As we all know Blogger is a free and widely used blogging platform and we are providing more tips and tricks for beginners. Here we will see about a simple trick on how to remove “powered by Blogger ” attribution from your Blogger blog. People who are using Blogger platform will have this powered by Blogger attribution below their blog. It comes by default in every template and it is an official representation for Blogger. Removing powered by Blogger attribution is simple. Just follow this step by step tutorial on how to remove powered by Blogger attribution using newHTML editor.

How to remove powered by Blogger attribution


1. Go to Blogger.com and login to your Blogger profile

2. Select  your blog that you wish to remove this attribute

3. Now go to template and click edit HTML


4. Here drop-down “jump to widget”  option and from that list select
    Attribution1 as highlighted below


 5.  Now in the editor press ctrl + F and find for this line <b:widget
       id=’Attribution1′ locked=’true’ title=” type=’Attribution’>


6. Now replace the locked=’ true’ in to locked=’ false’ as you can see
     highlighted below


7. Once done click save template

8. Now go to layout option and at the below you can see attribution
    gadget, click edit.

9. In that popup window click remove and you are done


Now go and view your site where you won’t see the “powered by
Blogger ” attribution.

Your copyright text is also removed along with powered by Blogger
attribution. To add copyright text just click add a gadget in layout
settings select HTML/JavaScript, add your copyright text and drag and
drop it below. Removing this powered by Blogger attribution adds
uniqueness to your blog and it shows your professionalism. Hope this
helped you on how to remove powered by Blogger attribution using new
HTML editor.